Showing posts with label testng. Show all posts

Monday, 16 March 2020

TestNG: Run tests inside a suite in parallel

You can run the tests inside a suite parallel by specifying thread count and setting parallel attribute to the value ‘tests’.

Example
<suite name="Parallel tests" parallel="tests" thread-count="2">

  <test name="ParallelTests1">
    <classes>
      <class name="com.sample.app.tests.ParallelTest1"></class>
      <class name="com.sample.app.tests.ParallelTest2"></class>
    </classes>
  </test>

  <test name="ParallelTests2">
    <classes>
      <class name="com.sample.app.tests.ParallelTest3"></class>
      <class name="com.sample.app.tests.ParallelTest4"></class>
    </classes>
  </test>

</suite>

In the above snippet, I specified thread count as 2. Test classes in ‘ParallelTests1’ are executed by one thread, and test classes in ‘ParallelTests2’ are executed by other thread.

Find the below working application.

ParallelTest1.java
package com.sample.app.tests;

import org.testng.annotations.Test;

public class ParallelTest1 {
  @Test
  public void a() {
    System.out.println("ParallelTest1_a is executed by : " + Thread.currentThread().getName());
  }

  @Test
  public void b() {
    System.out.println("ParallelTest1_b is executed by : " + Thread.currentThread().getName());
  }

  @Test
  public void c() {
    System.out.println("ParallelTest1_c is executed by : " + Thread.currentThread().getName());
  }

  @Test
  public void d() {
    System.out.println("ParallelTest1_d is executed by : " + Thread.currentThread().getName());
  }

  @Test
  public void e() {
    System.out.println("ParallelTest1_e is executed by : " + Thread.currentThread().getName());
  }
}

ParallelTest2.java
package com.sample.app.tests;

import org.testng.annotations.Test;

public class ParallelTest2 {
  @Test
  public void a() {
    System.out.println("ParallelTest2_a is executed by : " + Thread.currentThread().getName());
  }

  @Test
  public void b() {
    System.out.println("ParallelTest2_b is executed by : " + Thread.currentThread().getName());
  }

  @Test
  public void c() {
    System.out.println("ParallelTest2_c is executed by : " + Thread.currentThread().getName());
  }

  @Test
  public void d() {
    System.out.println("ParallelTest2_d is executed by : " + Thread.currentThread().getName());
  }

  @Test
  public void e() {
    System.out.println("ParallelTest2_e is executed by : " + Thread.currentThread().getName());
  }
}

ParallelTest3.java
package com.sample.app.tests;

import org.testng.annotations.Test;

public class ParallelTest3 {
  @Test
  public void a() {
    System.out.println("ParallelTest3_a is executed by : " + Thread.currentThread().getName());
  }

  @Test
  public void b() {
    System.out.println("ParallelTest3_b is executed by : " + Thread.currentThread().getName());
  }

  @Test
  public void c() {
    System.out.println("ParallelTest3_c is executed by : " + Thread.currentThread().getName());
  }

  @Test
  public void d() {
    System.out.println("ParallelTest3_d is executed by : " + Thread.currentThread().getName());
  }

  @Test
  public void e() {
    System.out.println("ParallelTest3_e is executed by : " + Thread.currentThread().getName());
  }
}

ParallelTest4.java
package com.sample.app.tests;

import org.testng.annotations.Test;

public class ParallelTest4 {
  @Test
  public void a() {
    System.out.println("ParallelTest4_a is executed by : " + Thread.currentThread().getName());
  }

  @Test
  public void b() {
    System.out.println("ParallelTest4_b is executed by : " + Thread.currentThread().getName());
  }

  @Test
  public void c() {
    System.out.println("ParallelTest4_c is executed by : " + Thread.currentThread().getName());
  }

  @Test
  public void d() {
    System.out.println("ParallelTest4_d is executed by : " + Thread.currentThread().getName());
  }

  @Test
  public void e() {
    System.out.println("ParallelTest4_e is executed by : " + Thread.currentThread().getName());
  }
}

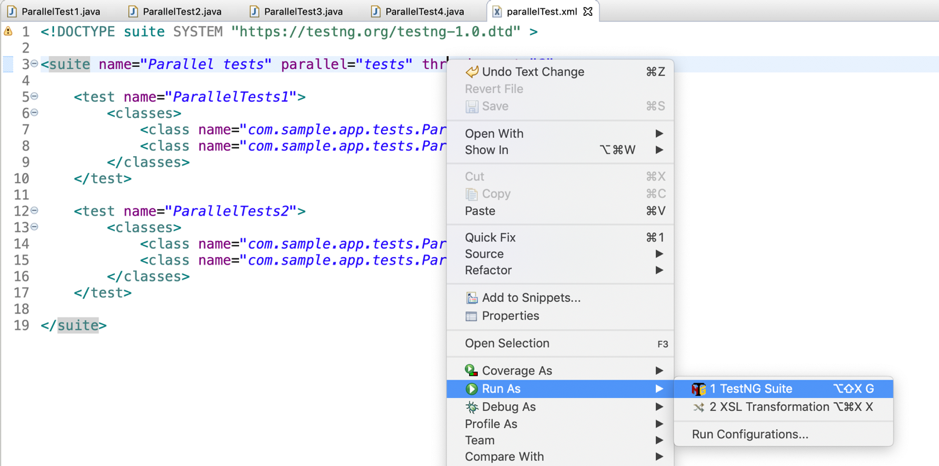
Create ‘parallelTest.xml’ file in the same package where the test classes are defined.

parallelTest.xml
<!DOCTYPE suite SYSTEM "https://testng.org/testng-1.0.dtd" >

<suite name="Parallel tests" parallel="tests" thread-count="2">

  <test name="ParallelTests1">
    <classes>
      <class name="com.sample.app.tests.ParallelTest1"></class>
      <class name="com.sample.app.tests.ParallelTest2"></class>
    </classes>
  </test>

  <test name="ParallelTests2">
    <classes>
      <class name="com.sample.app.tests.ParallelTest3"></class>
      <class name="com.sample.app.tests.ParallelTest4"></class>
    </classes>
  </test>

</suite>

How to run the test suite?
Right click on parallelTest.xml -> Run As -> TestNG Suite.


You will get below messages in console.

ParallelTest1_a is executed by : TestNG-tests-1
ParallelTest3_a is executed by : TestNG-tests-2
ParallelTest3_b is executed by : TestNG-tests-2
ParallelTest3_c is executed by : TestNG-tests-2
ParallelTest1_b is executed by : TestNG-tests-1
ParallelTest3_d is executed by : TestNG-tests-2
ParallelTest3_e is executed by : TestNG-tests-2
ParallelTest1_c is executed by : TestNG-tests-1
ParallelTest4_a is executed by : TestNG-tests-2
ParallelTest1_d is executed by : TestNG-tests-1
ParallelTest4_b is executed by : TestNG-tests-2
ParallelTest4_c is executed by : TestNG-tests-2
ParallelTest4_d is executed by : TestNG-tests-2
ParallelTest1_e is executed by : TestNG-tests-1
ParallelTest4_e is executed by : TestNG-tests-2
ParallelTest2_a is executed by : TestNG-tests-1
ParallelTest2_b is executed by : TestNG-tests-1
ParallelTest2_c is executed by : TestNG-tests-1
ParallelTest2_d is executed by : TestNG-tests-1
ParallelTest2_e is executed by : TestNG-tests-1


Previous                                                    Next                                                    Home

TestNG: Run test classes parallel

You can specify number of parallel threads that execute given suite of test classes in suite definition xml file.

Example
<suite name="Parallel Classes" parallel="classes" thread-count="2">

</suite>

Find the below working application.

ParallelClassDemo1.java
package com.sample.app.tests;

import org.testng.annotations.Test;

public class ParallelClassDemo1 {
  @Test
  public void a() {
    System.out.println("ParallelClassDemo1_a is executed by : " + Thread.currentThread().getName());
  }

  @Test
  public void b() {
    System.out.println("ParallelClassDemo1_b is executed by : " + Thread.currentThread().getName());
  }

  @Test
  public void c() {
    System.out.println("ParallelClassDemo1_c is executed by : " + Thread.currentThread().getName());
  }

  @Test
  public void d() {
    System.out.println("ParallelClassDemo1_d is executed by : " + Thread.currentThread().getName());
  }

  @Test
  public void e() {
    System.out.println("ParallelClassDemo1_e is executed by : " + Thread.currentThread().getName());
  }
}

ParallelClassDemo2.java
package com.sample.app.tests;

import org.testng.annotations.Test;

public class ParallelClassDemo2 {
  @Test
  public void a() {
    System.out.println("ParallelClassDemo2_a is executed by : " + Thread.currentThread().getName());
  }

  @Test
  public void b() {
    System.out.println("ParallelClassDemo2_b is executed by : " + Thread.currentThread().getName());
  }

  @Test
  public void c() {
    System.out.println("ParallelClassDemo2_c is executed by : " + Thread.currentThread().getName());
  }

  @Test
  public void d() {
    System.out.println("ParallelClassDemo2_d is executed by : " + Thread.currentThread().getName());
  }

  @Test
  public void e() {
    System.out.println("ParallelClassDemo2_e is executed by : " + Thread.currentThread().getName());
  }
}

parallelClasses.xml
<!DOCTYPE suite SYSTEM "https://testng.org/testng-1.0.dtd" >

<suite name="Parallel Classes" parallel="classes" thread-count="2">

  <test name="ParallelClassesDemo">
    <classes>
      <class name="com.sample.app.tests.ParallelClassDemo1"></class>
      <class name="com.sample.app.tests.ParallelClassDemo2"></class>
    </classes>
  </test>

</suite>

How to run the suite?
Right click on ‘parallelClasses.xml’ -> Run As -> TestNG Suite.

You will get below messages in console.

[RemoteTestNG] detected TestNG version 7.0.0
ParallelClassDemo1_a is executed by : TestNG-test=ParallelClassesDemo-1
ParallelClassDemo2_a is executed by : TestNG-test=ParallelClassesDemo-2
ParallelClassDemo1_b is executed by : TestNG-test=ParallelClassesDemo-1
ParallelClassDemo2_b is executed by : TestNG-test=ParallelClassesDemo-2
ParallelClassDemo1_c is executed by : TestNG-test=ParallelClassesDemo-1
ParallelClassDemo2_c is executed by : TestNG-test=ParallelClassesDemo-2
ParallelClassDemo1_d is executed by : TestNG-test=ParallelClassesDemo-1
ParallelClassDemo2_d is executed by : TestNG-test=ParallelClassesDemo-2
ParallelClassDemo1_e is executed by : TestNG-test=ParallelClassesDemo-1
ParallelClassDemo2_e is executed by : TestNG-test=ParallelClassesDemo-2

===============================================
Parallel Classes
Total tests run: 10, Passes: 10, Failures: 0, Skips: 0
===============================================


Previous                                                    Next                                                    Home

TestNG: Run test methods in parallel

You can specify number of parallel threads that execute given suite of test cases in suite definition xml file.

Example
<suite name="sanity test suite" parallel="methods" thread-count="3">

</suite>

Above snippet define 3 parallel threads to execute the test cases.

ParallelTestDemo1.java
package com.sample.app.tests;

import org.testng.annotations.Test;

public class ParallelTestDemo1 {

  @Test
  public void a() {
    System.out.println("a is executed by : " + Thread.currentThread().getName());
  }

  @Test
  public void b() {
    System.out.println("b is executed by : " + Thread.currentThread().getName());
  }

  @Test
  public void c() {
    System.out.println("c is executed by : " + Thread.currentThread().getName());
  }

  @Test
  public void d() {
    System.out.println("d is executed by : " + Thread.currentThread().getName());
  }

  @Test
  public void e() {
    System.out.println("e is executed by : " + Thread.currentThread().getName());
  }

  @Test
  public void f() {
    System.out.println("f is executed by : " + Thread.currentThread().getName());
  }

  @Test
  public void g() {
    System.out.println("g is executed by : " + Thread.currentThread().getName());
  }

}

Define ‘ParallelDemo1.xml’ file in the same package where ‘ParallelTestDemo1.java’ is created.

ParallelDemo1.xml
<!DOCTYPE suite SYSTEM "https://testng.org/testng-1.0.dtd" >

<suite name="sanity test suite" parallel="methods" thread-count="3">

  <test name="Demo test app">
    <classes>
      <class name="com.sample.app.tests.ParallelTestDemo1"></class>
    </classes>
  </test>

</suite>

How to run the suite?
Right click on suite file -> Run As -> TestNG Suite.

You will see below messages in console.

[RemoteTestNG] detected TestNG version 7.0.0
a is executed by : TestNG-test=Demo test app-1
b is executed by : TestNG-test=Demo test app-2
c is executed by : TestNG-test=Demo test app-3
e is executed by : TestNG-test=Demo test app-2
d is executed by : TestNG-test=Demo test app-3
f is executed by : TestNG-test=Demo test app-1
g is executed by : TestNG-test=Demo test app-2

===============================================
sanity test suite
Total tests run: 7, Passes: 7, Failures: 0, Skips: 0
===============================================


Previous                                                    Next                                                    Home

TestNG: Run Tests in parallel

TestNG support different ways to run the tests in parallel. In coming posts, you are going to learn.
a.   Run test methods in parallel
b.   Run test classes in parallel
c.    Run tests inside a suite in parallel


Previous                                                    Next                                                    Home

Sunday, 15 March 2020

TestNG: Run test cases using maven

Using 'maven-surefire-plugin', we can run the testng test cases.

Example
 <build>
  <plugins>
   <plugin>
    <groupId>org.apache.maven.plugins</groupId>
    <artifactId>maven-surefire-plugin</artifactId>
    <version>2.21.0</version>
    <configuration>
     <!-- TestNG Suite XML files list for test execution -->
     <suiteXmlFiles>
      <suiteXmlFile>src/test/resources/demo.xml</suiteXmlFile>
     </suiteXmlFiles>
    </configuration>
   </plugin>
  </plugins>
 </build> 

Add above snippet to pom.xml file. When you ran ‘mvn clean install’, it runs the test cases mentioned in demo.xml file.

Find the following application.

Step 1: Create ‘SurefirePluginTest.java’.
package com.sample.app.tests;

import static org.testng.Assert.assertTrue;

import org.testng.annotations.Test;

public class SurefirePluginTest {

 @Test
 public void a() {
  assertTrue(true);
 }

 @Test
 public void b() {
  assertTrue(true);
 }

 @Test
 public void c() {
  assertTrue(true);
 }
}

Step 2: Create demo.xml file in src/test/resources.

demo.xml
<?xml version="1.0" encoding="UTF-8" ?> 
<!DOCTYPE suite SYSTEM "http://testng.org/testng-1.0.dtd">
<suite name="Suite">
 <test name="Groups smoke test demo">

  <classes>
   <class name="com.sample.app.tests.SurefirePluginTest" />
  </classes>
 </test>
</suite>  

Step 3: Update pom.xml with surefire plugin.

pom.xml
<project xmlns="http://maven.apache.org/POM/4.0.0"
 xmlns:xsi="http://www.w3.org/2001/XMLSchema-instance"
 xsi:schemaLocation="http://maven.apache.org/POM/4.0.0 http://maven.apache.org/xsd/maven-4.0.0.xsd">
 <modelVersion>4.0.0</modelVersion>
 <groupId>com.sample.app</groupId>
 <artifactId>testng</artifactId>
 <version>1</version>

 <build>
  <plugins>
   <plugin>
    <groupId>org.apache.maven.plugins</groupId>
    <artifactId>maven-surefire-plugin</artifactId>
    <version>2.21.0</version>
    <configuration>
     <!-- TestNG Suite XML files list for test execution -->
     <suiteXmlFiles>
      <suiteXmlFile>src/test/resources/demo.xml</suiteXmlFile>
     </suiteXmlFiles>
    </configuration>
   </plugin>
  </plugins>
 </build>

 <dependencies>
  <!-- https://mvnrepository.com/artifact/org.testng/testng -->
  <dependency>
   <groupId>org.testng</groupId>
   <artifactId>testng</artifactId>
   <version>7.0.0</version>
   <scope>test</scope>
  </dependency>

 </dependencies>
</project>

Navigate to the directory where pom.xml is located and execute the command ‘mvn clean install’.

If you are using eclipse, you can even run the application from eclipse.

Right click on the project -> Run As -> Run Configurations…


Click on Main tab, in the goals text field, add the string clean install
Click on Run button. You will see below messages in console

[INFO] --- maven-surefire-plugin:2.21.0:test (default-test) @ testng ---
[INFO] 
[INFO] -------------------------------------------------------
[INFO]  T E S T S
[INFO] -------------------------------------------------------
[INFO] Running TestSuite
[INFO] Tests run: 3, Failures: 0, Errors: 0, Skipped: 0, Time elapsed: 0.259 s - in TestSuite
[INFO] 
[INFO] Results:
[INFO] 
[INFO] Tests run: 3, Failures: 0, Errors: 0, Skipped: 0


Previous                                                    Next                                                    Home

TestNG: surefire reports

TestNG framework allow us to generate test reports information in both XML and HTML format.

ReportDemo.java
package com.sample.app.tests;

import static org.testng.Assert.assertTrue;

import org.testng.annotations.Test;

public class ReportDemo {

 @Test
 public void A() {
  assertTrue(false);
 }

 @Test
 public void B() {
  assertTrue(true);
 }
}

Run ReportDemo.java as ‘TestNG Test’.

Refresh the project, you can observe there is a folder ‘test-output’.

Open emailable-report.html file, you can see the information about test cases.


Open index.html to get more detailed report information.
Previous                                                    Next                                                    Home

TestNG: IExecutionListener: Monitor test starts and ends.

IExecutionListener is used to to monitor when a TestNG run starts and ends.

IExecutionListener provide following methods.

Method
Description
void onExecutionStart()
Invoked before the TestNG run starts.
void onExecutionFinish()
Invoked once all the suites have been run

Find the below working application.

Step 1: Implement IExecutionListener interface

CustomExecutionListener.java
package com.sample.app.tests;

import org.testng.IExecutionListener;

public class CustomExecutionListener implements IExecutionListener{
 public void onExecutionStart() {
  System.out.println("TestNG about to start execution");
 }
 
 public void onExecutionFinish() {
  System.out.println("All the test cases are executed");
 }
}

Step 2: Define test classes.

Test1.java
package com.sample.app.tests;

import org.testng.annotations.Test;

public class Test1 {
 @Test
 public void A() {
  System.out.println("Inside Test1 A");
 }
}

Test2.java
package com.sample.app.tests;

import org.testng.annotations.Test;

public class Test2 {

 @Test
 public void A() {
  System.out.println("Inside Test2 A");
 }
}

Step 3: Define suite. Create ‘execListener.xml’ file in the same package where the test classes are defined.

execListener.xml
<!DOCTYPE suite SYSTEM "https://testng.org/testng-1.0.dtd" >

<suite name="sanity test suite" time-out="5000">

 <listeners>
  <listener
   class-name="com.sample.app.tests.CustomExecutionListener"></listener>
 </listeners>

 <test name="Demo test app">
  <classes>
   <class name="com.sample.app.tests.Test1"></class>
   <class name="com.sample.app.tests.Test2"></class>
  </classes>
 </test>

</suite>

How to run the suite?
Right click on ‘execListener.xml’ file -> Run As -> TestNG Suite.


You will see below messages in console.

[RemoteTestNG] detected TestNG version 7.0.0
TestNG about to start execution
Inside Test1 A
Inside Test2 A

===============================================
sanity test suite
Total tests run: 2, Passes: 2, Failures: 0, Skips: 0
===============================================

All the test cases are executed


Previous                                                    Next                                                    Home