In this post, I am going to explain a hello world project in Eclipse.
Step 1: Create new maven project ‘hello-world-eclipse’.
Step 2: Update pom.xml with maven dependencies.
pom.xml
<project xmlns="http://maven.apache.org/POM/4.0.0"
	xmlns:xsi="http://www.w3.org/2001/XMLSchema-instance"
	xsi:schemaLocation="http://maven.apache.org/POM/4.0.0 https://maven.apache.org/xsd/maven-4.0.0.xsd">
	<modelVersion>4.0.0</modelVersion>
	<groupId>com.sample.app</groupId>
	<artifactId>hello-world-eclipse</artifactId>
	<version>1</version>

	<parent>
		<groupId>io.micronaut</groupId>
		<artifactId>micronaut-parent</artifactId>
		<version>3.7.0</version>
	</parent>

	<properties>
		<packaging>jar</packaging>
		<jdk.version>11</jdk.version>
		<release.version>11</release.version>
		<micronaut.version>3.7.0</micronaut.version>
		<micronaut.runtime>netty</micronaut.runtime>
		<exec.mainClass>com.sample.app.App</exec.mainClass>
	</properties>

	<repositories>
		<repository>
			<id>central</id>
			<url>https://repo.maven.apache.org/maven2</url>
		</repository>
	</repositories>

	<dependencies>
		<dependency>
			<groupId>io.micronaut</groupId>
			<artifactId>micronaut-inject</artifactId>
			<scope>compile</scope>
		</dependency>
		<dependency>
			<groupId>io.micronaut</groupId>
			<artifactId>micronaut-validation</artifactId>
			<scope>compile</scope>
		</dependency>
		<dependency>
			<groupId>io.micronaut</groupId>
			<artifactId>micronaut-http-client</artifactId>
			<scope>compile</scope>
		</dependency>
		<dependency>
			<groupId>io.micronaut</groupId>
			<artifactId>micronaut-http-server-netty</artifactId>
			<scope>compile</scope>
		</dependency>
		<dependency>
			<groupId>io.micronaut</groupId>
			<artifactId>micronaut-jackson-databind</artifactId>
			<scope>compile</scope>
		</dependency>
		<dependency>
			<groupId>jakarta.annotation</groupId>
			<artifactId>jakarta.annotation-api</artifactId>
			<scope>compile</scope>
		</dependency>
		<dependency>
			<groupId>ch.qos.logback</groupId>
			<artifactId>logback-classic</artifactId>
			<scope>runtime</scope>
		</dependency>
		<dependency>
			<groupId>io.micronaut.test</groupId>
			<artifactId>micronaut-test-junit5</artifactId>
			<scope>test</scope>
		</dependency>
		<dependency>
			<groupId>org.junit.jupiter</groupId>
			<artifactId>junit-jupiter-api</artifactId>
			<scope>test</scope>
		</dependency>
		<dependency>
			<groupId>org.junit.jupiter</groupId>
			<artifactId>junit-jupiter-engine</artifactId>
			<scope>test</scope>
		</dependency>
	</dependencies>

	<build>
		<plugins>
			<plugin>
				<groupId>io.micronaut.build</groupId>
				<artifactId>micronaut-maven-plugin</artifactId>
			</plugin>
		</plugins>
	</build>

</project>
<exec.mainClass> specifies main class to run the application.
Step 3: Define HelloWorldController class.
HelloWorldController.java
package com.sample.app.controller;

import io.micronaut.http.MediaType;
import io.micronaut.http.annotation.Controller;
import io.micronaut.http.annotation.Get;

@Controller("/hello")
public class HelloWorldController {

	@Get(produces = MediaType.TEXT_PLAIN)
	public String index() {
		return "Hello World";
	}
}
a. The @Controller annotation defines the class as a controller mapped to the path /hello
b. The @Get annotation maps the index method to all requests that use an HTTP GET
c. A String "Hello World" is returned as the response
Step 4: Define main application class.
App.java
package com.sample.app;

import io.micronaut.runtime.Micronaut;

public class App {
	public static void main(String[] args) {
		Micronaut.run(App.class, args);
	}
}
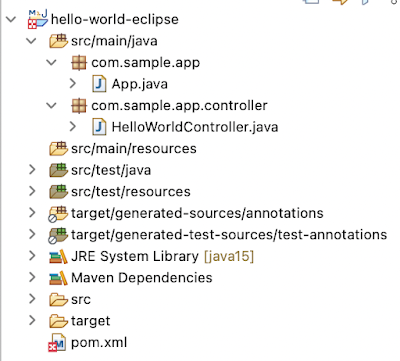
Total project structure looks like below.
How to get the jar file?
Navigate to the folder where pom.xml is located. Execute the command ‘mvn clean install’.
Upon command execution, you can see a jar file ‘hello-world-eclipse-1.jar’ is created in target folder.
How to run the jar file?
Run the jar file by executing below command.
java -jar ./target/hello-world-eclipse-1.jar
Once the application started successfully, open the url ‘http://localhost:8080/hello’ in browser, you will see following kind of screen.
You can download this application from this link.
In my next post, I am going to explain how to test hello world app using Micronaut Http Client.


No comments:
Post a Comment