If you do not configure any data store to your application, Spring batch store all the job details in-memory. But one problem with in-memory data store is, when the application quits or restarted, in-memory details will get deleted.
We can solve above problem by configuring a data source. Once you configure a data source to your application, Spring-Batch create following six tables.
a. BATCH_JOB_INSTANCE
b. BATCH_JOB_EXECUTION
c. BATCH_JOB_EXECUTION_PARAMS
d. BATCH_JOB_EXECUTION_CONTEXT
e. BATCH_STEP_EXECUTION
f. BATCH_STEP_EXECUTION_CONTEXT
I will explain about the tables in detail in my later posts.
Following are the key terms you should understand.
Job: Job is a collection of steps, where each step perform a dedicated task.
JobInstance: A JobInstance refers to the concept of a logical job run.
JobExecution: A JobExecution refers to the technical concept of a single attempt to run a Job. An execution may end in failure or success, but the JobInstance corresponding to a given execution is not considered to be complete unless the execution completes successfully.
For example, you created a job ‘DailyReports’ that run every day at 11PM to collect summary of all employee login and logout times. Then there is one JobInstance created for every day. For example one JobInstance is created for Monday, another JobInstance is created for Tuesday etc.,
A JobInstance can have one or more JobExecutions. For example When a JobExecution for the day Monday is failed, then JobInstance create another JobExecution for the same day (Monday).
Follow below step to develop an application that configure H2 as a data source.
Step 1: Create new Java Project 'hello-world-datasource'.
Step 2: Update pom.xml with maven dependencies.
pom.xml
<project xmlns="http://maven.apache.org/POM/4.0.0"
	xmlns:xsi="http://www.w3.org/2001/XMLSchema-instance"
	xsi:schemaLocation="http://maven.apache.org/POM/4.0.0 http://maven.apache.org/xsd/maven-4.0.0.xsd">
	<modelVersion>4.0.0</modelVersion>
	<groupId>com.sample.app</groupId>
	<artifactId>hello-world-datasource</artifactId>
	<version>1</version>

	<parent>
		<groupId>org.springframework.boot</groupId>
		<artifactId>spring-boot-starter-parent</artifactId>
		<version>2.1.6.RELEASE</version>
	</parent>

	<properties>
		<project.build.sourceEncoding>UTF-8</project.build.sourceEncoding>
	</properties>

	<dependencies>

		<!-- https://mvnrepository.com/artifact/org.springframework.batch/spring-batch-core -->
		<dependency>
			<groupId>org.springframework.batch</groupId>
			<artifactId>spring-batch-core</artifactId>
		</dependency>

		<dependency>
			<groupId>org.springframework.boot</groupId>
			<artifactId>spring-boot-starter-web</artifactId>
		</dependency>

		<dependency>
			<groupId>org.springframework.boot</groupId>
			<artifactId>spring-boot-starter-data-jpa</artifactId>
		</dependency>

		<dependency>
			<groupId>com.h2database</groupId>
			<artifactId>h2</artifactId>
		</dependency>
	</dependencies>
</project>
Step 3: Create a package ‘com.sample.app.configuration’ and define ‘JobConfiguration.java’.
JobConfiguration.java
package com.sample.app.configuration;

import org.springframework.batch.core.Job;
import org.springframework.batch.core.Step;
import org.springframework.batch.core.StepContribution;
import org.springframework.batch.core.configuration.annotation.EnableBatchProcessing;
import org.springframework.batch.core.configuration.annotation.JobBuilderFactory;
import org.springframework.batch.core.configuration.annotation.StepBuilderFactory;
import org.springframework.batch.core.scope.context.ChunkContext;
import org.springframework.batch.core.step.tasklet.Tasklet;
import org.springframework.batch.repeat.RepeatStatus;
import org.springframework.beans.factory.annotation.Autowired;
import org.springframework.context.annotation.Bean;
import org.springframework.context.annotation.Configuration;

@Configuration
@EnableBatchProcessing
public class JobConfiguration {
	@Autowired
	private JobBuilderFactory jobBuilderFactory;

	@Autowired
	private StepBuilderFactory stepBuilderFactory;

	private static int count = 0;

	@Bean
	public Step step() {
		return this.stepBuilderFactory.get("step1").tasklet(new Tasklet() {
			@Override
			public RepeatStatus execute(StepContribution contribution, ChunkContext chunkContext) {
				System.out.println(count + ". Hello, World!");

				count++;

				if (count < 5) {
					return RepeatStatus.CONTINUABLE;
				} else {
					return RepeatStatus.FINISHED;
				}

			}
		}).build();
	}

	@Bean
	public Job job() {
		return this.jobBuilderFactory.get("job").start(step()).build();
	}
}
Step 4: Define App.java
App.java
package com.sample.app;

import org.springframework.batch.core.configuration.annotation.EnableBatchProcessing;
import org.springframework.boot.SpringApplication;
import org.springframework.boot.autoconfigure.SpringBootApplication;

@EnableBatchProcessing
@SpringBootApplication
public class App {

	public static void main(String[] args) {
		SpringApplication.run(App.class, args);
	}
}
Create ‘application.properties’ file under ‘src/main/resources’ folder.
application.properties
logging.level.root=WARN
logging.level.org.hibernate=ERROR

## H2 specific properties
spring.h2.console.enabled=true
spring.h2.console.path=/h2

spring.datasource.url=jdbc:h2:file:~/db/myOrg.db;DB_CLOSE_ON_EXIT=FALSE;DB_CLOSE_DELAY=-1;

spring.datasource.username=krishna
spring.datasource.password=password123

spring.datasource.driverClassName=org.h2.Driver

## JPA specific properties
# Creates the schema, destroying previous data.
spring.jpa.hibernate.ddl-auto=create

spring.jpa.database-platform=org.hibernate.dialect.H2Dialect

spring.jpa.show-sql=false
spring.jpa.properties.hibernate.format_sql=false

## Database connection pooling properties
# Number of ms to wait before throwing an exception if no connection is available.
spring.datasource.max-wait=10000

# Maximum number of active connections that can be allocated from this pool at the same time.
spring.datasource.tomcat.max-active=10
spring.datasource.tomcat.max-idle=5
spring.datasource.tomcat.min-idle=3
Total project structure looks like below.
Run App.java
You will see below messages in console.
  .   ____          _            __ _ _
 /\\ / ___'_ __ _ _(_)_ __  __ _ \ \ \ \
( ( )\___ | '_ | '_| | '_ \/ _` | \ \ \ \
 \\/  ___)| |_)| | | | | || (_| |  ) ) ) )
  '  |____| .__|_| |_|_| |_\__, | / / / /
 =========|_|==============|___/=/_/_/_/
 :: Spring Boot ::        (v2.1.6.RELEASE)

2020-03-29 20:50:33.612  WARN 95281 --- [           main] aWebConfiguration$JpaWebMvcConfiguration : spring.jpa.open-in-view is enabled by default. Therefore, database queries may be performed during view rendering. Explicitly configure spring.jpa.open-in-view to disable this warning
2020-03-29 20:50:33.704  WARN 95281 --- [           main] o.s.b.a.batch.JpaBatchConfigurer         : JPA does not support custom isolation levels, so locks may not be taken when launching Jobs
0. Hello, World!
1. Hello, World!
2. Hello, World!
3. Hello, World!
4. Hello, World!
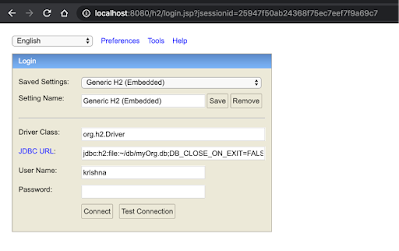
Open the url 'http://localhost:8080/h2' in browser.
Give the user Name as ‘krishna’ and password as ‘password123’ and click on Connect button.
You can see all the tables in left side of the window.
Click in the table 'BATCH_JOB_INSTANCE', you can observe the query 'SELECT * FROM BATCH_JOB_INSTANCE' is populated automatically in SQL execution widget.
Click on Run button to see the contents of table.
That’s it you are done. Let’s discuss about the tables in detail in my next post.
You can download complete working application from this link.
https://github.com/harikrishna553/springboot/tree/master/batch/hello-world-datasource
Previous Next Home


No comments:
Post a Comment